This blog post really should be titled “How Plan to Eat Taught Us How to Meal Plan and Saved Us Hours of Tears” but…that feels a little intense.
But it’s true!
Also hi — it’s Cassie, Kaylie’s wife. I know I’m typically in the background here, but since I’m the one who has explored more of Plan to Eat’s features, it made more sense for me to write this review. Just be forewarned: Kaylie’s love of You Need a Budget is nothing compared to how I feel about Plan to Eat. (Okay, they’re pretty similar.)
We’ve been using Plan to Eat for almost two years now, and it’s the one subscription that has had the most noticeable effect on my day-to-day life.
Before we started using Plan to Eat, we meal planned in our heads, using pen and paper, and occasionally in a Google Doc. I also tried setting up a Google calendar at one point, but that was a short-lived experiment.
There were three problems with those methods:
- First, it required us to either remember all of the recipes we liked or to keep a bookmarks tab full of recipes. We would try to do that, but we couldn’t maintain it and searching through it sucked. I also tried to input our recipes into a Google spreadsheet and into Airtable — both tools that I use all the time, and simply could not get on board with when it came to recipe storage.
- Second, we would write out our meal plan, stick to it for a day or two, and then promptly get off track. Once we missed one day, it was like we were afraid to look at the meal plan again because it would remind us that we had failed. It’s intense meal plan shame, I know.
- The third problem was food waste and overshopping. We’d go through each recipe, one by one, to make our grocery list. Then, we’d add in our snacks and the other staples we needed. But inevitably, we would end up buying too much of one ingredient (hello, cilantro) and forgetting other ingredients entirely. We’d also have to keep running out to the grocery store because we’d forgotten things.
In short, our old methods sucked.
We both love to cook, but actually doing it caused us a lot of stress, and because of the stress, we’d end up ordering takeout or skipping meals entirely.
We were introduced to Plan to Eat via You Need a Budget — because we had a YNAB subscription, we got two months of Plan to Eat free. I didn’t think much of it at first, but the more I explored Plan to Eat, the more obsessed I became. In our house, I shout about Plan to Eat features the way Kaylie shouts about YNAB’s new product rollouts.
(Psst — Plan to Eat is having a 50% off sale for their annual subscriptions for Black Friday weekend)

You might be thinking this is all very overboard for an app that helps you meal plan. But meal planning can be pretty stressful. And if you’re a parent, or overworked, or have brain fog, then trying to actually remember the meals that you enjoy (and what ingredients they require) is totally unrealistic.
So, here are the 11 reasons why I’m obsessed with Plan to Eat. (As a heads-up, this whole thing sounds like an ad, but it isn’t. I’m just actually that obsessed. There are some affiliate links used, though.)
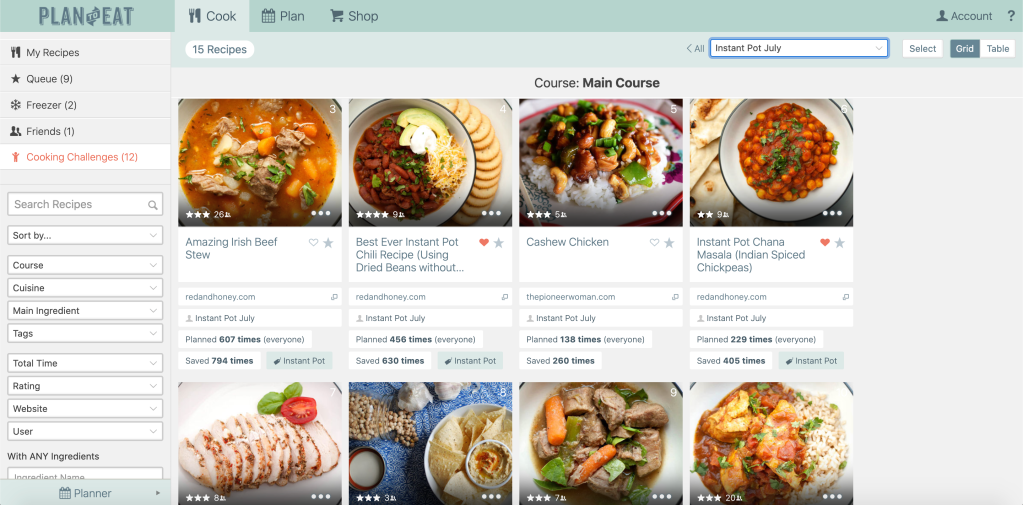
1. The digital recipe library is amazing and easily searchable
You can build your own recipe library within Plan to Eat, so all of your favorite recipes are just right there in front of your face. We have 211 recipes in ours, and we try to add 5-10 more each month, just to keep things fresh.
One of my favorite parts of the recipe library is the fact that you can import recipes from your favorite meal blogs. All you have to do is copy/paste the URL, make sure everything imports correctly, add whatever tags you want, and you’re done!
Of course, you can also write in your own recipes (and import from other recipe apps, too). Within the library you can leave recipe ratings, add prep notes, add tags (like “Instant Pot” or “20-minute meal”), and even leave comments to yourself.
You can also add in nutritional serving and estimated costs, too.
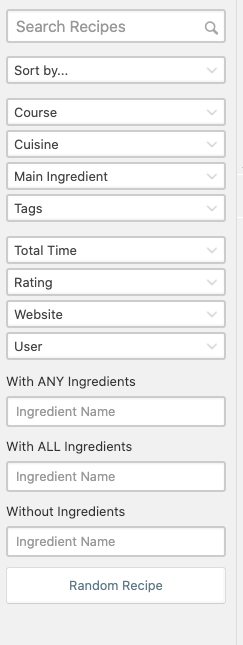
Plan to Eat’s recipe library is the biggest time-saving part of the app, because it makes planning meals super easy. You can search and filter through your library incredibly easily — I’ll often search for all meals tagged “Instapot” so that we can have at least one really fast meal each week.
2. You can assign prep notes to recipes
When you were a kid, did you ever have the experience of hearing your parent pull into the driveway and then…you panicked because you forgot to take the chicken out to thaw?
Yeah. I did. A lot.
I’ve also done that as a grown-ass adult. Before we started using Plan to Eat, forgetting to take the meat out of the freezer happened at least once a week, and then we’d end up getting takeout or making pasta again.
About a year into using Plan to Eat, I finally tried out the prep notes function. I had assumed it was just an extension of the written directions, but wowza was I wrong. Adding something to the prep notes creates a “task” associated with that recipe, so every single time you schedule it, the task will get added to the calendar too.
Say that I’m planning on making carnitas. I know that it takes about three days for a pork shoulder to thaw in the fridge, so in my carnitas recipe, I can add a prep note that says “three days before planned date: remove pork from freezer.” Then, the prep note will show up on my calendar (on the appropriate day) reminding me to take the goddamn meat out of the freezer.
The prep notes setting has also been really helpful when we make bean or pasta salads for lunches. They usually need to sit in their sauce overnight, so we have to make them the day before. The prep notes remind us to actually do that, instead of forgetting and missing lunch.
3. You can add meals to your “freezer”
There are a handful of recipes that we only really make to freeze. In Plan to Eat, you can actually designate a recipe as “prep for freezer.” Then, it’ll get added to your freezer tab — an area that basically has an inventory of all of your complete frozen meals — and you can plan meals straight from there.
We get a bunch of frozen food from Trader Joe’s, and Whole Foods frozen pizzas are a staple in our house. So one day, we’ll get our act together and add those as “recipes” so that we can add them to the freezer, too. Sometimes it’s just helpful for an app to remind you that those easy-to-make things are there and ready!
Frozen recipes show up differently on your calendar, so you can remember that they need extra time to cook or thaw (and you can add that as a prep note, too).
4. It’s really a food planner, not just a meal planner
When I think of meal planning, I think of entire meals. And I’ll be honest with you – I’m not great about eating whole meals. But in Plan to Eat, you can even plan out what snacks you’ll eat on which days.
That’s an easy way to remind yourself that “oh right, I have sourdough pretzel bites in the pantry” so that at least you eat something, even if you aren’t feeling your lunch plans.
5. It auto-generates a grocery list for you
Remember how one of our major problems was translating our meal plan into a grocery list? Well with Plan to Eat, we literally never have to worry about that. Once we make our meal plan, we just head over to the “shop” tab and voilà, our list is there!
Once we get that preliminary list, we go through it and see if there’s anything that we already have. We can also go through and add in staple items, like milk.
Most of the time, we use Plan to Eat on desktop. But when we grocery shop, we use the mobile app to check items off as we go. If you’re more of a paper list person, you can even print out a list to take with you – it’ll be categorized by type of item! Produce, meat, dry goods, and more will each be in their own categories for easy organizing.
Plus, you can add different grocery stores in. We typically get our meat and dairy from a different store than our canned goods, and Plan to Eat knows that, so it puts them into two separate sections.
If you’re a grocery delivery buff, you can even use the Instacart (or local grocery store) integration to easily import your grocery list into Instacart. Honestly, I wish I had known about this when we were still doing big grocery deliveries.
6. You can queue up cravings
Kaylie and I typically crave pretty different things throughout the week, which can add lots of extra time to our meal planning section of our staff meeting. One way that we’ve worked around this is via the queue function.
It works like this: If there’s a recipe that sounds really good to you that week, you tap a button to add it to your Plan to Eat queue. The queue is basically a shortlist of recipes (which is helpful when you have 200+ recipes saved). Then, you can meal plan straight from your queue!
Using the queue is how we negotiate what meals we’ll eat each week. If Kaylie has put chili or taco soup in the queue every week for three weeks, I know that she really wants to have some soon. So, we can quickly plan it in.
If you have a bunch of people in your household who all want a say in what you eat each week, the queue can save you lots of negotiation time!
7. Planning out upcoming meals is super easy
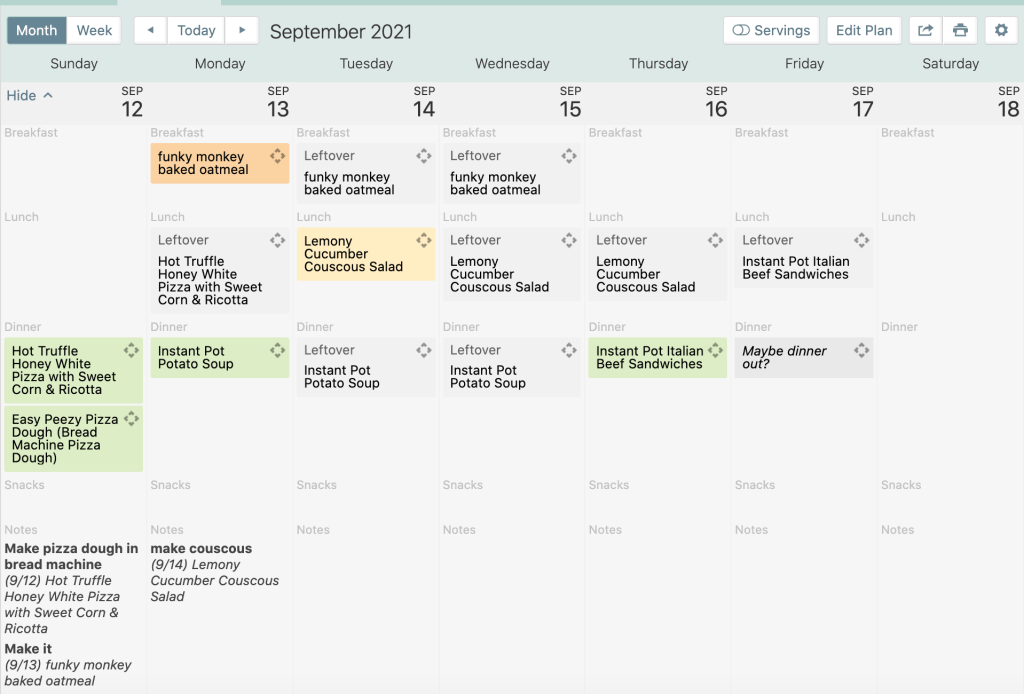
You can use the planner function on mobile, but we always use it on desktop. You just drag the recipe you want from the queue (or the search sidebar, or from your filtered list) onto the day that you want to eat it.
If you have a prep note attached, it’ll automatically schedule itself onto the right day.
You can also factor in leftovers using the app’s “Plan as Leftovers” function. Since we’re just two people, most of the meals we make have several servings of leftovers. Using the plan as leftovers function helps make it easy for us to figure out what days we need to actually make a lunch, which evenings we’ll rely on leftovers, and how far a meal will take us.
If you change your mind or need to reschedule something, just drag your recipe onto a new date or delete it from the calendar entirely.
8. You can create themed, reusable menus
So, a meal plan is inherently a menu. But what if you have some things that you consistently eat time and time again? Or, meals that you might eat back to back?
For example, if I make carnitas, it’ll make more food than we would reasonably know what to do with. Plus, there are a lot of different things I could do with it – I could make burritos, or rice bowls, or soup.
So, I can make a menu called “carnitas menu” that incorporates all of those things. All I have to do is drag recipes or ingredients onto the menu creator in the order that I want to make them. Then, I can save the menu, and next time I make carnitas, I don’t have to add all of those things to my meal plan schedule! I just can drag the “carnitas” menu to the meal plan and it’ll automatically add everything to the calendar in the same chronological order I used for my template.
9. There’s an easy “start cooking” view
It’s really hard to check a recipe when your hands are messy. You have to wash them a ton, or, if you just don’t care, then you go and be gross and touch your phone with your dough hands. Whatever.
One day, I was making an involved meal and getting annoyed that my phone kept putting the recipe screen to sleep. Sometimes I print out recipes, but most of the time, I just look at them in the Plan to Eat app.
Then…I tapped a button I had been ignoring for months. It said “start cooking” and I had assumed it was a timer or something. It’s not. It basically tells your phone or tablet “hey, this is actively being used right now” so that you don’t have to touch the screen with your gross food hands.
You can look at an overview of the instructions or a step-by-step screen. This feature made me understand why people use iPads in their kitchens – I first used this feature on my iPad and it showed me the recipe list and the step-by-step instructions all in one place, and it was just very satisfying.
10. You can keep it in the family or be social
You can connect with friends within Plan to Eat, which can make your recipes viewable to them (if you want). You can opt to keep certain recipes private, so if you’re planning a surprise birthday cake or you have a top-secret family recipe, you can make that unviewable by anyone other than you.
But if you do add friends, you can see their recipes and their menus, which can significantly expand your recipe repertoire.
Plan to Eat also has a bunch of “challenges” that you can follow along with or use as recipe inspiration. The challenge recipes are all public and you can see how people have rated them and how many times they’ve been planned (but you can’t see people’s private comments).
11. It’s a very affordable subscription
Plan to Eat is a paid app, but it’s incredibly affordable – $5.95 per month or $49 for the year. I’m 110% confident that we’ve saved way more than $49 per year using Plan to Eat, even when you look at our absolutely obscene 2021 grocery budget.
The best part? You don’t need a credit card to start a free trial and they won’t automatically charge you when your subscription is up. They’re all about you being in control, so if you decide you’re done with the app, no worries – you won’t be charged. When you log in after your expiration date, you’ll be prompted to submit payment, and then everything else will continue as usual.
Okay. I realize this whole thing sounds like an ad, but I swear it’s not. Plan to Eat has no idea I exist. But I truly am obsessed, and if you’ve been struggling with meal planning, I think you will be too! Sign up for a free trial here and let me know how it goes!
-xoxo, The Finance Femme (Cassie)

Leave a comment